
Administration
For the admins of a workspace: create the workspace, invite the team, split repositories between teams, set up single sign-on, and keep the registry token. Open each page from the workspace menu, the button at the right of the header.
Create a workspace #
- Go to sc.tuxcare.cloud and select the button of your sign-in provider, for example Continue with Google, Continue with GitHub, or Continue with Microsoft.
- On Your workspaces, type a name in Workspace address. The name becomes the address of the workspace, for example
acme.sc.tuxcare.cloud. - Type the name of your company or other legal entity in Legal name of your organization. If you use SecureChain for yourself, type your own name.
- Read the SecureChain Portal agreements, and select the box to accept them.
- Select Create workspace, then Open. You are the first admin.
- Invite your team, and send the first scan: see Get started.
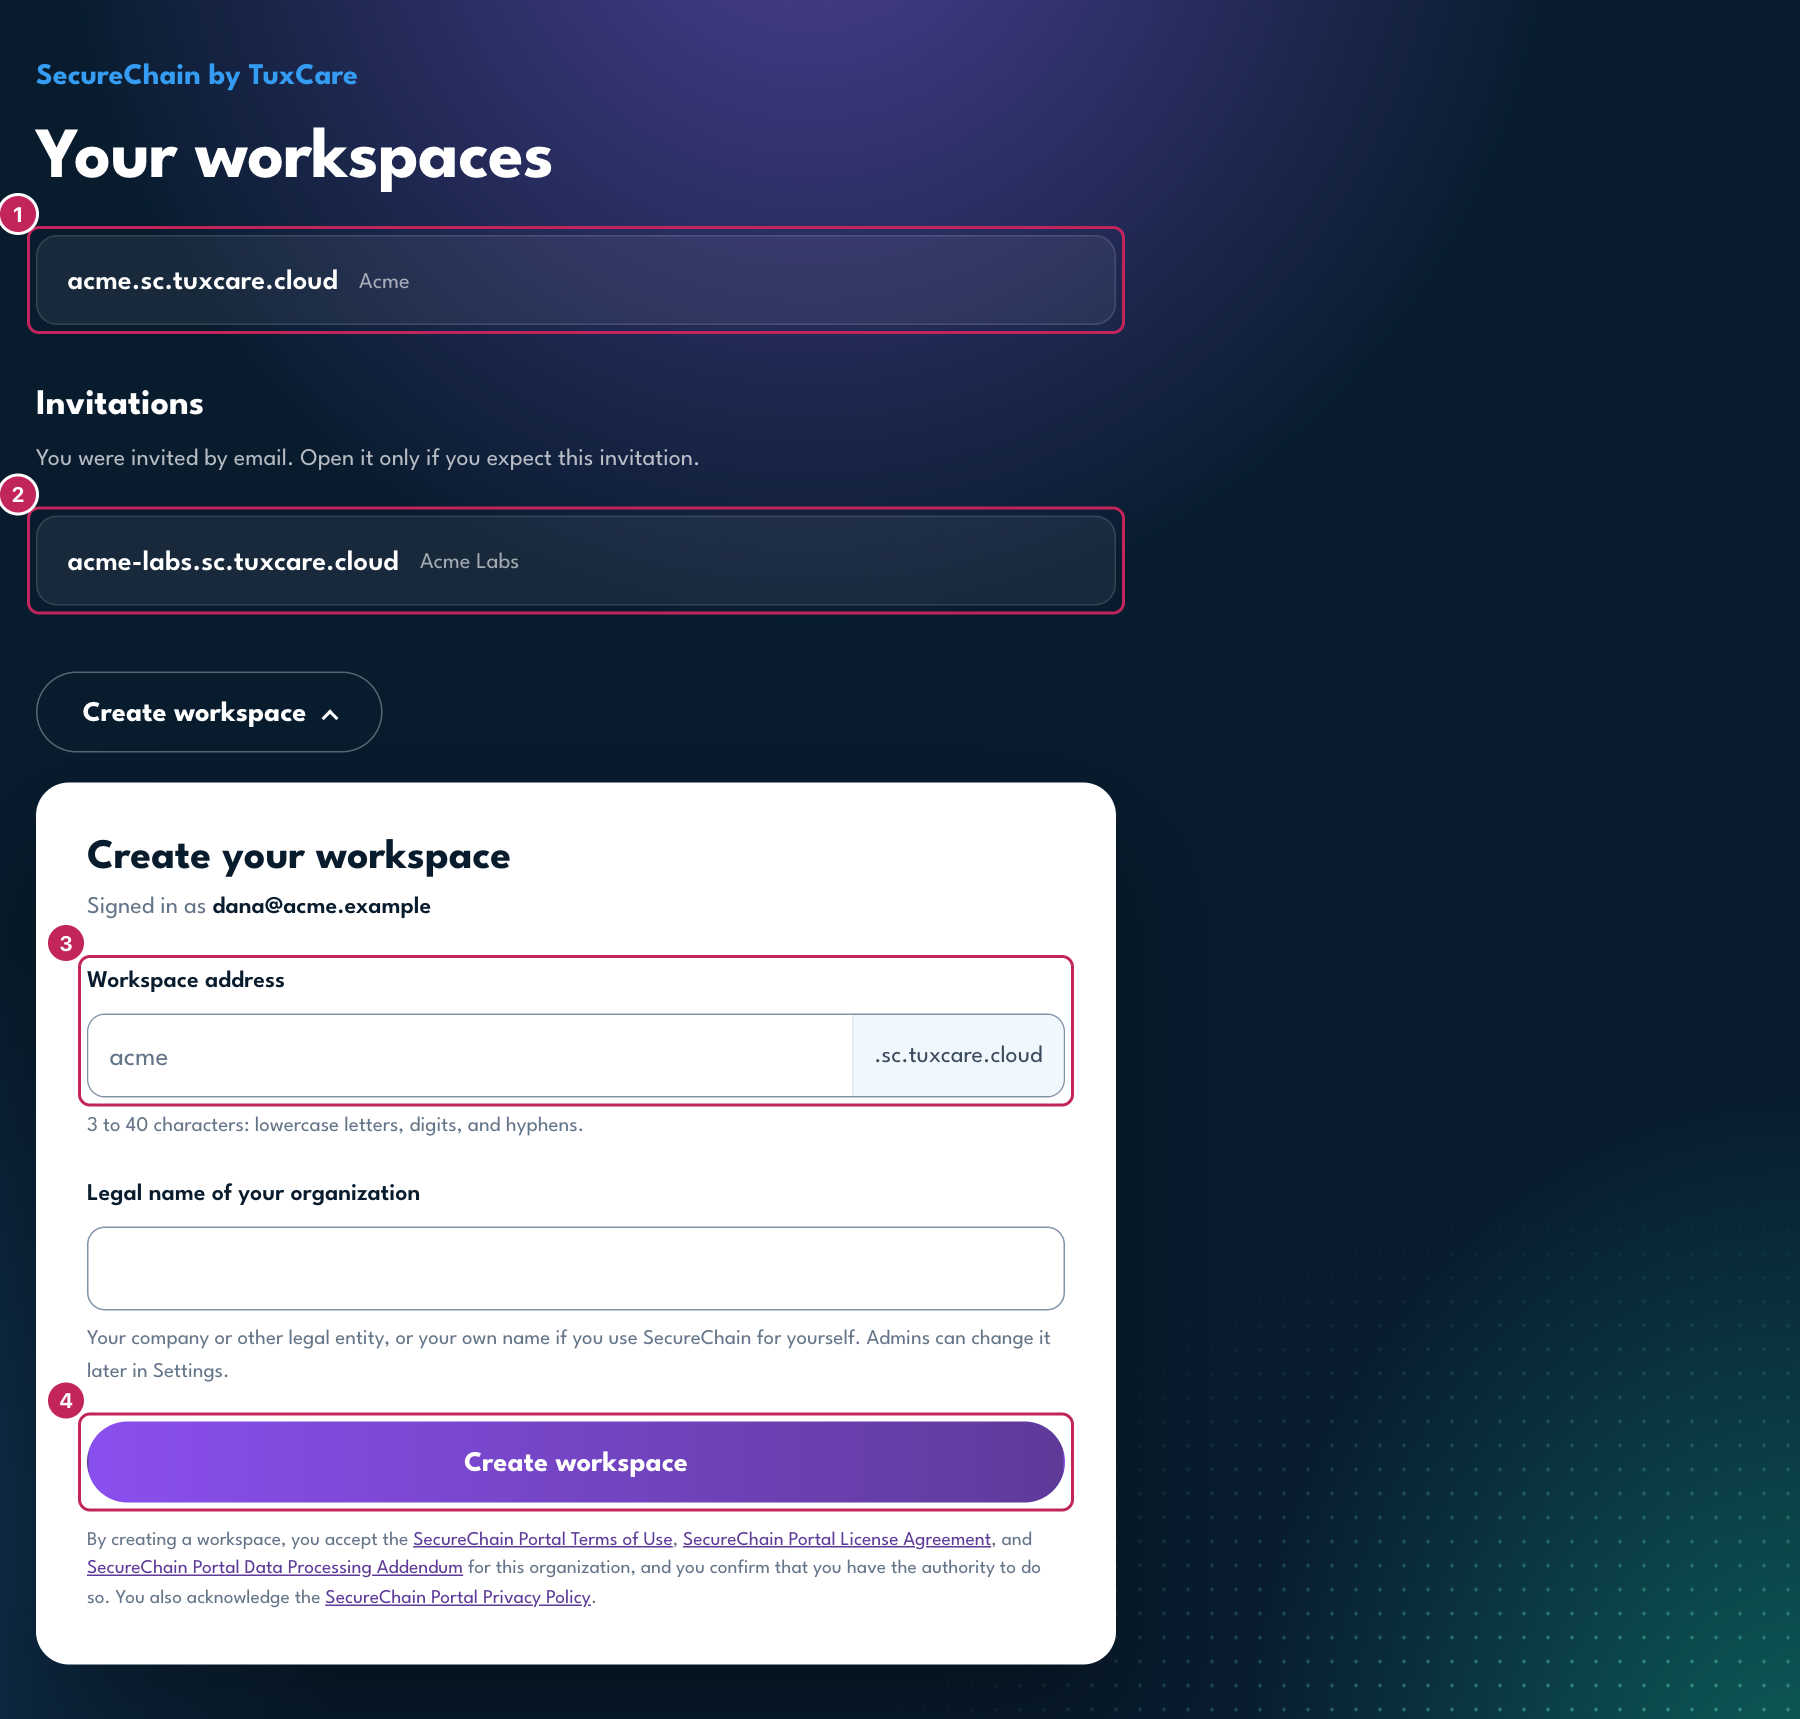
- The workspaces that you can open. Select one to go to it.
- Your invitations. Open one only if you expect it.
- The address of the new workspace.
- Create workspace makes the workspace.
Workspace name rules #
- 3 to 40 characters: lowercase letters, digits, and hyphens. No hyphen at the start or at the end.
- The name cannot start with
xn--, and characters 3 and 4 cannot be--. - Some names are reserved, for example
www,api,auth,admin, andstatus. - Each name is unique. If another workspace has it, the page shows
subdomain is in use
.
Users #
Open Users. Each user has one role for the whole workspace: admin, member, or viewer. Roles lists what each role can do.
- Invite: type the email address, the name, and the role, then select Invite. The person signs in at sc.tuxcare.cloud with that email address. The user is
Pending
until the first sign-in. Resend invitation sends the email again. - Join by email domain: under Settings › Sign-in, select Edit under Join by email domain, type the domains of your company, and select the role (member or viewer). Everyone with a Google Workspace account in those domains can then join with no invitation. You can add a domain only after a person of the workspace signed in once with an address at that domain. Free-mail domains such as gmail.com are refused.
- Allowed sign-in providers: under Settings › Sign-in, select Edit under Allowed sign-in providers, select the providers that people can sign in with (for example only Google), and select Save. A sign-in through another provider is refused, and the message names the allowed providers. The list must keep the provider that you signed in with, so you cannot lock yourself out. Allow every provider removes the limit. A person who is signed in keeps the session until it ends. The list also holds for the CLI browser login (
securechain auth login): a provider that the list refuses gets no CLI token. The CLI browser login goes through the TuxCare sign-in, so a list with only single sign-on providers refuses it, and the people of such a workspace use an access token. A token that exists keeps working until it ends: to stop it, revoke it on the Access tokens page. The use of a token is not a sign-in, so the list does not limit it. The portal does not check the second factor (MFA): the provider does. To require MFA, allow only providers that enforce it, for example Google with 2-Step Verification turned on for your Google Workspace. - Change a role: use the role list on the row of the user.
- Disable: select Disable. The user cannot sign in, and the tokens of the user stop. Enable reverses it. The portal does not delete users, so the audit log keeps their names. The portal does not learn that your identity provider removed a person: the provider refuses the next sign-in, but the tokens of the user keep working. Disable the user here to stop them.

- The invitation form.
- The role of a user.
- Resend invitation and Disable.
The workspace always keeps one active admin. You cannot remove the admin role from the last admin, or disable the last admin. A user marked Email stopped
has an address that bounced: see Email that does not arrive.
Departments #
Departments split the repositories of a workspace between teams. A member or a viewer with a seat in a department sees only the repositories of that department.
- Open Departments. Type a name and select Create department.
- Open the department. Under Repositories, add the repositories of the team: type a part of the name in Assign a repository, select the repository in the list, and select Assign.
- Under Members, add the members and viewers of the team.

- The form that creates a department.
- The members of the department.
- The repositories of the department.
- Admins, and users with no seat, see every repository.
- A repository can be in more than one department. A repository in no department is visible only to admins and to users with no seat.
- A seat never gives more than the role of the user. A viewer stays a viewer.
- The token of a user with a seat sends scans only to the repositories where a seat gives the member role.
- Members can add repositories. When a member with a seat sends a scan of a new repository, the portal adds the repository to each department where the member has a member seat. The switch Members can add repositories on the Departments page controls this. It is on by default. When it is off, only an admin or a department token can add a repository.
- When you delete a department, its repositories go back to no department, and the portal revokes its department tokens. The portal asks you to confirm.
- A department controls who sees a repository. A product groups repositories for the CRA clocks. The two are separate.
Single sign-on #
Add the identity provider of your organization under Settings › Sign-in. The portal supports Google, Microsoft Entra ID, any OpenID Connect provider, and SAML 2.0.
- Select the type, and type an id and a button label.
- Fill in the fields of the provider: the issuer URL, the client id, and the client secret for OpenID Connect, or the IdP metadata for SAML.
- Copy the Callback URL (OpenID Connect), or the ACS URL and the Entity ID (SAML), into the provider.
- Set Allowed domains to your email domains. The portal refuses free-mail domains.
- Select the provisioning mode.
invite
lets only invited addresses sign in.jit
makes a user at the first sign-in, with the Default role. - Select Test. Then sign in with the new button in a private browser window.

- The type of the provider.
- The allowed domains, the provisioning mode, and the default role.
- The callback URL to copy into the provider.
The portal uses the email of a first sign-in only when the provider confirms that the email is verified:
- OpenID Connect: the ID token must say
email_verified: true. If your provider does not send the claim, and nobody can choose an email that they do not own, select Trust unverified email. - Microsoft Entra ID: add the optional claim
xms_edovto the ID token in the app registration. - SAML 2.0: the email of the assertion is enough.
The provider handles multi-factor authentication. The sign-in must start at the portal.
Session idle time #
A browser session ends after a time with no activity, and the person signs in again. With no value of your own, the workspace uses the default of the service. An admin can set a shorter time under Settings › Session idle time:
- Type the time in minutes. The lowest value is 5 minutes. The form shows the highest value, which is the default of the service.
- Select Save.
Select Use the default to remove your value.
The time applies to every browser session of the workspace, also a TuxCare staff session and a sign-in with a token. API tokens and CLI tokens do not change. A shorter time reaches the open sessions at their next request: a session that is already idle for longer ends then. Opening a page counts as activity. A page that waits for a new scan also counts, until the match ends.
Only an admin can read or change the value. The Audit log records each change as settings.session_idle.
Registry token #
Settings › Registry token keeps the token of the TuxCare registry. The CLI reads it with the access token of a developer or a CI job: securechain registry login on a computer, and securechain registry env in CI. So each person and each pipeline keeps only one secret. You need it only for TuxCare builds.
- Save it one time. Replace it when TuxCare gives you a new one. Then each person runs
securechain registry loginagain. - Leave the user name empty for the TuxCare registry. Set it only for your own mirror that asks for one.
- Renovate and Dependabot read the TuxCare registry with the same token, kept as a secret of the bot. See Renovate and Dependabot.
- The section shows who saved the token and when.
- Each member, and each CI token with the submit permission, can read the whole token through the CLI. A viewer cannot. Each read goes into the Audit log, one row a day for each token and network, and the section shows the last one. Replace the token when a member leaves.

Use the TuxCare registry #
Settings › Use the TuxCare registry says whether the CLI points the package managers at the TuxCare registry, and whether securechain auth login writes the registry token into the user files of the package managers. It is on by default. Turn it off when the builds of the workspace use only your own package repositories. When it is off, the CLI gets no registry address and no registry token.
A repository can override the value in both directions: open the repository, select More, and under Use the TuxCare registry select Workspace default, On, or Off. Only an admin can change the value of the workspace. A member or an admin of a repository can change the value of that repository; a viewer and a CI token cannot. The audit log records each change with the old and the new value. See Use the TuxCare registry, or your own repositories.
The other parts of Settings: Organization (see Organization), Fix deadlines (see Fix deadlines), Host criticality rules (see Criticality), Show the coverage sections in the CLI report (see Coverage sections of the CLI report), and API and MCP access (see Turn the API or MCP on).
Coverage sections of the CLI report #
Settings › Show the coverage sections in the CLI report says whether the human report of the securechain CLI shows the coverage sections: COVERED, UNPROTECTED, NO COVERAGE, and NOT ANALYSED. It is off by default: the report shows the findings and the summary, and hides these sections. Turn it on when the people of the workspace want to see them in each run.
- The option applies to each CLI run of the workspace that talks to the portal. The CLI reads it at the start of the run.
- A flag of the CLI shows or hides the sections for one run. The flag wins over the option.
- The JSON, SARIF, and SBOM outputs do not change: they hold the same data with the option on or off.
- A CLI release from before the option shows the sections in each run, whatever the option says.
- Only an admin can change the option. The audit log records each change as
settings.show_coverage_sections.
Organization #
Settings › Organization keeps the legal name of the organization that uses the workspace. Each acceptance of the SecureChain Portal agreements records it. To change the name, type the new name in Legal name of your organization and select Save. The new name applies to the next acceptances only. The audit log records each change.
If the workspace has no legal name, each admin sees the terms page at the next sign-in and types the name there.
The table Acceptances lists the newest 100 acceptances: the date, the person, the organization, the version of each document, the version of the Privacy Policy, and the source. The source is Signup for the person who created the workspace, Terms page for an acceptance in the browser, and CLI login for an acceptance on the CLI login page. A row stays after an admin removes the person.
Audit log #
The Audit log page lists each management action, newest first: when, who, from which address, the action, the object, and the detail. It records token, user, department, repository, product, and triage changes, and the reads of the registry token through the CLI.
- Type in Actor contains to keep the actions of one person or token.
- Type in Action contains to keep one kind of action, for example
token. - The page shows 100 entries. Load older shows the next 100.
Limits #
Your plan sets the limits of the workspace: repositories, users, tokens, webhooks, scans a day, scan slots, releases, and how long the portal keeps old scans. At a limit, the portal answers with status 429 and names the limit:
{"error":"quota exceeded","quota":"repos","limit":1000}- The
repos,slots, andsubmissions_per_daylimits count repositories and images. A host does not count in them. - Hosts have a daily limit of their own,
host_scans_per_day, counted on the new scans of your hosts. When your plan does not set it, it is the same number assubmissions_per_day. A host that sends the same packages again does not count. At the limit, the portal answers 429 with the quotahost_scans_per_dayto each host upload until 00:00 UTC. - The daily scan limit resets at 00:00 UTC. A repeat of the same scan counts. A failed upload does not.
- The
tokenslimit counts the tokens that work. A revoked or expired token does not count. A CLI browser login makes a token, so the limit applies to it too. - A scan slot is one repository, branch or tag, project path, and set of ecosystems. The portal keeps the newest scan of each slot. A branch or tag that is not the default branch and has had no scan for the age limit of your plan is removed with all its scans, and frees its slot. A release and a host are never removed this way. The
slotslimit refuses a scan that starts a new slot. A new scan of a slot that exists is not refused. - The
releaseslimit refuses a new release name. A scan that joins a release that exists is not refused. Delete a release to free its place. - Each token can send 10 requests a second, with a burst of 30. Above that, the portal answers 429
rate limited
. - The app shows this refusal in words: it names the limit and what you can do. At the
tokenslimit, revoke the tokens that you no longer use on the Access tokens page. - To raise a limit, contact TuxCare.
Manage or delete the workspace #
Sign in at sc.tuxcare.cloud. Your workspaces lists the workspaces that you can open, and your invitations. Manage workspaces lists the workspaces that you own. Sign out in the header ends the sign-in to the site; your workspace sessions stay as they are.
To delete a workspace that you own, select it on Manage workspaces, type its name, and confirm. Sign-in and all tokens stop at once. TuxCare removes the data after a retention period.
Before you delete it, download the SBOMs, reports, and VEX files that you want to keep.
Next: TuxCare Radar